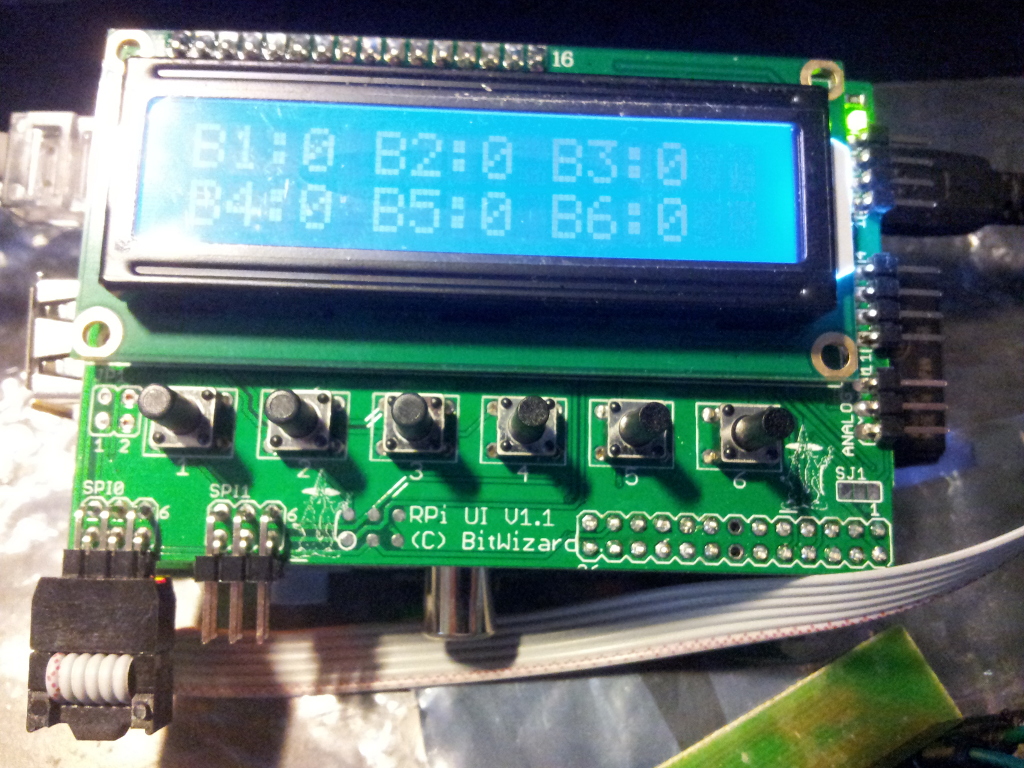
I’ve bought two expansion boards from Bitwizard NL for the all wonderful Raspberry PI: one RPi User Interface and one Big Relay. The UI because no DIY electronic project is complete without an LCD and the Big Relay because you need relays if you want to interface the Raspberry Pi with anything big (and the Gertboard costs too much for my current needs). The Bitwizard Wiki is a very good source of documentation and the boards are very well produced, so I can happily recommend them. Here’s a small tutorial showing how to use them together – read the state of physical buttons, display their state on LCD and turn on/off the corresponding relay (6 buttons, 6 relays).
For the moment, I’m prototyping with shell scripting, so you need to get and install bw_tool. Connect the RPi UI board on top of the Raspberry Pi using the GPIO header and the Big Relay board to the SPI0 header of the RPi UI board (using a 6 wire flat cable). It has to look like this:
Next, the logical flow step by step:
– clear the display
– read the button state
– adjust numeric values accordingly to the button state
– set the relay state
– display button state on LCD
– go to “read the button state” and repeat
The script is written in bash.
Clearing the display is done with the following command (needs to be run only once, at beginning of script):
/usr/bin/bw_tool -a 94 -r 16 -v 0
Next, we read the button state.
B1=$(echo "ibase=16;`/usr/bin/bw_tool -a 94 -R 0x20:s`"|bc)
That means to read the 0x20 port (for button 1), translate the hex value by feeding the result into bc and assign the result to variable B1. A pressed button means B1 will have the value 257 (0101 in hex), an unpressed button will have the value 0. Let’s adjust accordingly:
if [ $B1 = 257 ]; then
		B1=0;
		bw_tool -a 9c -w 20:1
	else
		B1=1;
		bw_tool -a 9c -w 20:0
	fi
Now we know that B1 is 0 for unpressed button and 1 for pressed button, so in the same if we can control the corresponding relay. “9c” is the SPI address of the Big Relay board and port 0x20 is the port corresponding to the first relay. We write “1” for closing the relay and “0” for opening it.
After the buttons’ state has been read and the relays turned on/off, we can display their status on the LCD:
/usr/bin/bw_tool -a 94 -r 17 -v 0
/usr/bin/bw_tool -a 94 -t "B1:$B1 B2:$B2 B3:$B3  "
/usr/bin/bw_tool -a 94 -r 17 -v 32
/usr/bin/bw_tool -a 94 -t "B4:$B4 B5:$B5 B6:$B6  "
and finally:
sleep 1
For all your Raspberry Pi and Arduino needs, head over to RoboFun.
Te pregatesti de un nou HU pentru Jimny ?
Nici gând. Prefer să las asta în grija firmei care produce head unituri de multă vreme, știu mai bine. În plus, Pi-ul are ieșire analogică destul de slabă, trebuia amplificator … și dacă tot pun amplificator, de ce să nu folosesc ieșirea digitală … și asta înseamnă optic sau sunet prin HDMI … și după aia interfața … și uite așa o ia omul razna și ajung să ascult muzică pe speaker la mobil 🙂
Daca-i Sony si are XLoud, e bine s’asa 😛
Daca nu, in gradina 😀 Cu boxa de gradina si piticii aferenti 😀 😀
Păi s-ar preta jucăreaua la o automatizare … tre’ să patentez primul pitic de grădină care cântă maneaua preferată a posesorului când îl detectează în apropiere și-o să fiu bogat 😀